Using this website
Here you will learn everything about using the Sympathetic Resonances site. Don't let the page size intimidate you, the Getting started section only takes about 2-3 minutes to read. You may want to keep this page open while working in another browser tab.Table of contents
- Getting started
- Editing mbira parts
- Managing multiple parts
- Saving & duplicating pieces
- Sharing pieces
- Transforming pieces
- Piece metadata
- Preferences
- Notations
Getting started
Signing up
In order to store your own mbira pieces, please register as a user. Click on the "Login" button at the menu bar in the upper right corner, and choose "Sign up".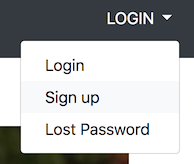
User profile and privacy
The signup form asks for a few personal details, your name, email address, city, and country. User accounts are tied to a single email address - you cannot register twice with the same email.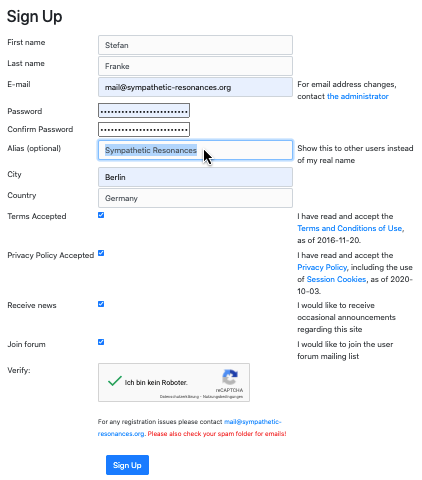
- As the author of a piece (on the piece's page and in groups)
- As a group member (on the member list)
- When the website sends an email on your behalf (when sharing pieces or managing groups)
Aliases
If you prefer your name not to be shown to other users, fill in the Alias field. The alias is shown instead of your name throughout the website (unless when sending emails on your behalf). Aliases may also make you more recognizable, e.g. as a member of an organization, or if there is another user of the same or similar name.Browsing pieces
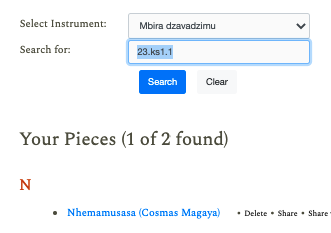
Logging in, or clicking the “Your Pieces” button in the menu bar gets you to your personal archive.
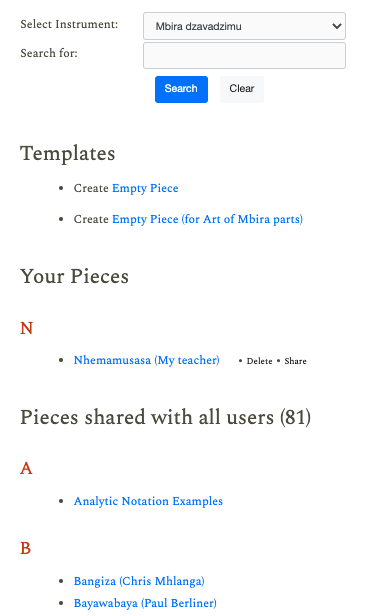
Searching pieces
Type in one or more search terms and hit the Search button or Enter key to show only pieces matching the terms. Press the Clear button to again show all pieces.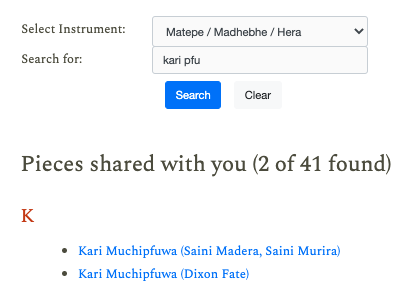
 ↔
↔
Viewing pieces
Each piece page has two sections: Metadata at the top, and a list of musical parts underneath. Empty metadata fields are hidden until you press "▶ Show all fields".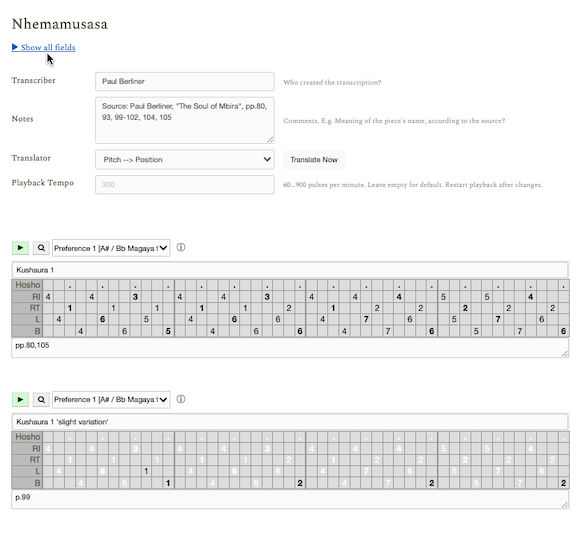
Playback
You can audition a part with the ► (Play) button. Usually playback starts at the beginning of the part, but you can start at any other point.


Restart audio after changes
When you press the ► button, the web server synthesizes an audio file from the part and streams it to your browser. Therefore, after editing a pattern, you must stop and restart playback to hear your changes.Generating a fresh audio file
Subsequent playbacks of an unchanged part re-use the audio file. On rare occasions something might go wrong, and the audio file would not sound as expected. Hold the Shift/⇧ key while clicking on ► or "+" to make the server generate an fresh audio file.Choosing playback sound
Pick the playback instrument from the dropdown list next to the play buttons:
Instrument reference key
Each line starts with the pitch on the chromatic scale closest to the instrument's "reference key". The reference key is an arbitrary choice, simply to have a reference for comparing instruments' relative pitches. In general, the lowest key on the instrument is picked as the reference. Otherwise another prominent key, which is then mentioned in the notations section.Choosing your preferred tuning
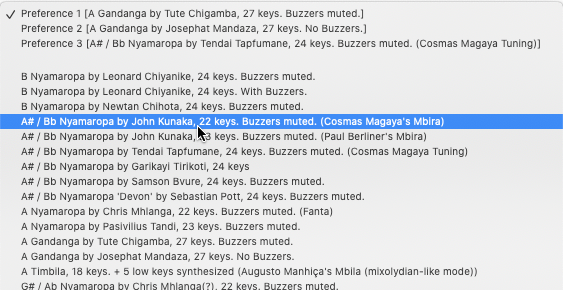
The three ‘Preference’ entries at the top are placeholders which you can personalize in order to play all content in your preferred tuning. Public pieces use Preference 1 for Kushaura parts, #2 for Kutsinhira parts, and #3 for occasional third parts.
Playback tempo
The current playback tempo can be determined (and stored per piece) in the according field:
Visualization
Click the button to show an animated picture of the instrument.
Non-existent keys
If a piece contains notes for which there is no key in the "virtual mbira" picture, a key label is shown instead, roughly at the position where the respective key would sit.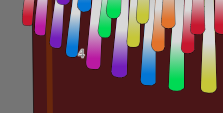
a green key right below the blue LI5.
Hints
- If the animation and audio playback are/get out of sync, please make sure that there are no delays in the audio path (e.g. bluetooth speakers), and try reducing your web browser's and computer's processor load by closing windows and other applications.
- For learning a piece from the animation, you may want to slow down the tempo, or edit the piece so that the animation shows exactly the parts you want to learn. For example you might duplicate the part multiple times, and then delete pulses to extract only one quarter or half of the part. Or delete all notes of one hand to focus on the other. All your changes are temporary unless a piece is saved.
Using another notation
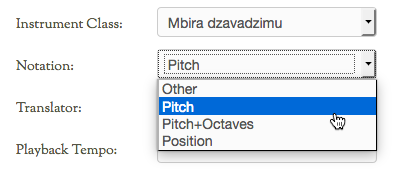
If you have used tabular mbira transcriptions before, the tables may look familiar, but perhaps you wonder about the numbers. The example pieces use the numbers 1-7 to enumerate the seven pitch classes (scale degrees) in each register. This notation is called Pitch. You can translate the piece to another notation by selecting a Translator from the "Other Notations" section and pressing the “Translate Now” button.Editing mbira parts
Creating a new piece
Click again on “Your Pieces” at the menu bar, to get to your list of pieces, then on "Create Empty Piece" in the Template Pieces section. This section contains templates which will automatically be copied before editing.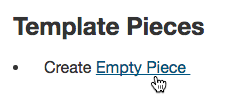
Editor buttons
In order to keep the user interface tidy, most editing controls are hidden at first. Click anywhere on the table to reveal them: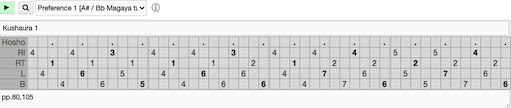
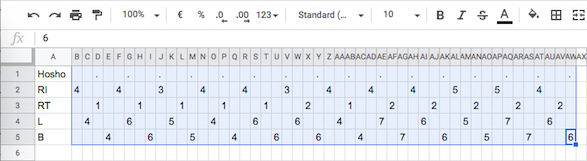
Editing and selecting cells
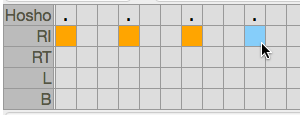
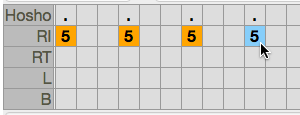
Let’s first look at the tabular section in the lower half. It works a bit like a spreadsheet app. Click on an empty cell, type “Hi” and press the Enter key: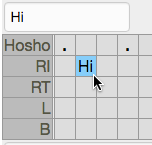

Playback start and selection
While editing the table, press the Space bar to start playback from the (leftmost) selected column, regardless of any playback start point preference. When you click the play button and only the cursor is visible, then playback starts at the beginning of the part. As soon as more than one cell is selected, the playback starts at the leftmost selected column. This allows you to start playback at any point on a touchscreen, too, by clicking a column twice before hitting the Play button.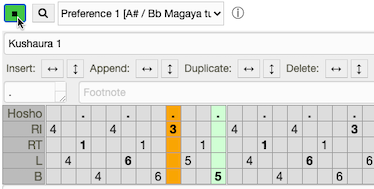
Cut, Copy, Paste, Duplicate
Inside a table, use these shortcuts for familiar clipboard and editing operations. Note: There are a couple of limitations for different browsers:- You can only invoke the commands via the browser's Edit menu in Firefox (not in Chrome).
- The Paste (overwrite all) command does only work in Chrome, not Firefox.
- The shortcuts do not work in Safari and Internet Explorer.
| Command | MacOS shortcut | Windows shortcut |
|---|---|---|
| Cut | ⌘X | Ctrl+X |
| Copy | ⌘C | Ctrl+C |
| Paste | ⌘V | Ctrl+V |
| Paste (overwrite all) | ⇧⌘V | Shift+Ctrl+V |
| Duplicate | ⌘D | Ctrl+D |
| Duplicate (overwrite all) | ⇧⌘D | Shift+Ctrl+D |
| Select All | ⌘A | Ctrl+A |
 →
→
 →
→
Copying notes from/to another piece or spreadsheet
The Cut and Copy commands copy notes into your computer's clipboard. You can paste them into any other part, even between browser tabs. You can also copy & paste table data from spreadsheet software like Microsoft Excel, Apple Numbers and Google Sheets.
Copy ↕ Paste
Workaround for clipboard commands in all browsers
Since the input field always reflects the selected data in the table, you can use this simple method as a workaround if your browser does not support the Copy/Paste keyboard shortcuts: Whenever you would normally press ⌘/Ctrl+X, C or V, press the Enter key first, then ⌘/Ctrl+X, C or V, and then Enter again. This moves the focus to the input field and back to the table, and directs the clipboard command to the input field.Cell details
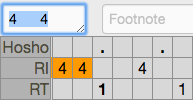
Besides the display text, each cell can also store additional information. Simply select a cell, and type a note into the details field: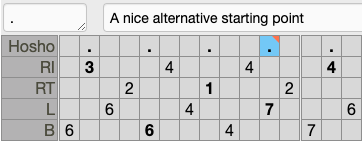
Changing the number of rows or columns
So far we were only editing the content of the table. To change the number of columns (pulses) or rows (tracks), use the buttons with an arrow label.
- Insert: Insert one or more new columns or rows at the cursor position.
Select a range of cells before pressing the Insert button in order to insert the same number of rows or columns.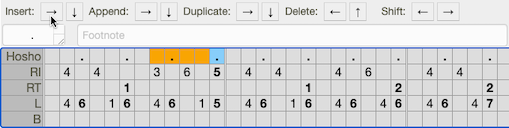 ↓
↓
- Append: Append one or more rightmost empty columns, or rows at the bottom.
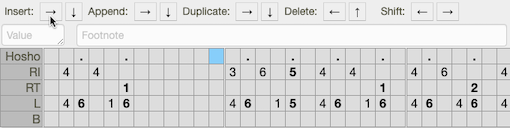
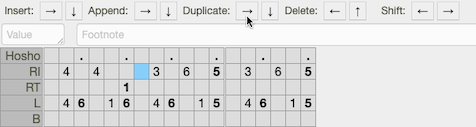
Select a range of cells before pressing the Append button in order to append the same number of rows or columns. - Duplicate: Duplicate the selected columns or rows.
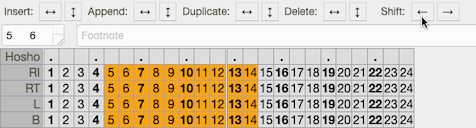
To duplicate a range of pulses, select the desired range (in any row) by holding Shift/⇧, then press the Duplicate → button: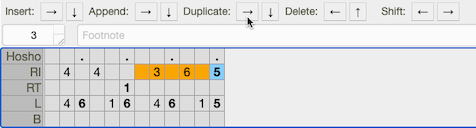 ↓
↓
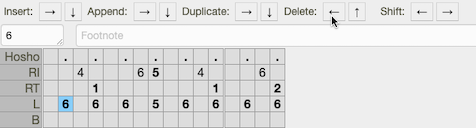
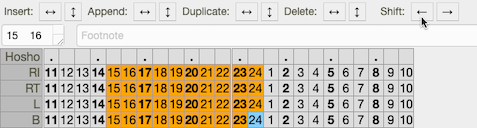
- Delete: Delete the selected columns or rows.
To delete a range or even non-consecutive selection of pulses or tracks, select them holding the Shift/⇧ or Ctrl/⌘ key, and press the respective “Delete” button. ↓
↓
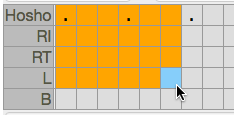
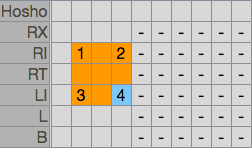
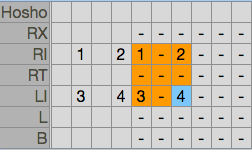
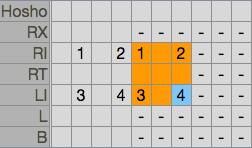
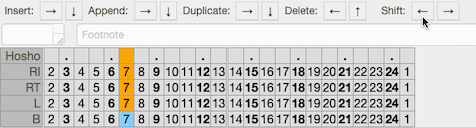
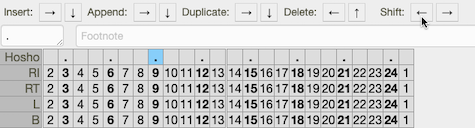
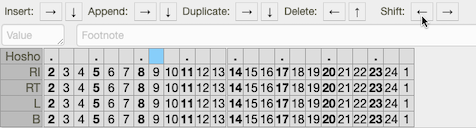
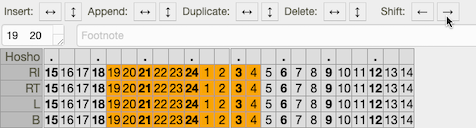
Shifting the pattern to a different starting point
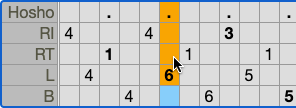
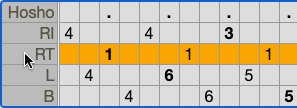
The “Shift ← →” button shift the selected rows cyclically left or right. To shift the whole part, click a cell twice to select all rows: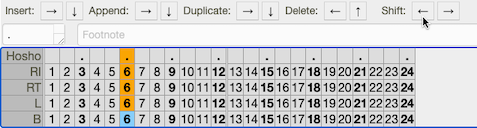
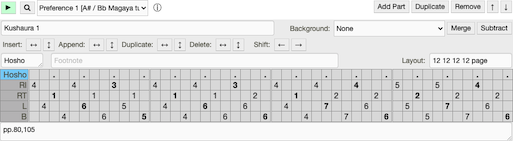
Part layout
The “Layout” field next to the footnote determines the table's layout.
Table contents
You can put any text into table cells. When playing back parts, only valid combination of row captions and cells (e.g. RT and 3) are considered, everything else is ignored.Lyrics and free form content
When translating the piece to another notation, invalid combinations of captions and cells are marked as not translatable. To avoid this and keep free form information (like lyrics) in place across translation, use tracks with empty captions at the bottom of the table:
Managing multiple parts
Heading and comments
A piece’s page may contain any number of parts (somewhat limited by the increasing loading times of the page). Each part has heading and comments fields for additional information. It’s a good idea to put some description into the Heading field which uniquely identifies it in the context of the piece. Headings e.g. show up in the background menu.

The part list
Use the “Add Part” button on the right hand side to create a new, empty part underneath the current one.

Parts in the background of another
Parts can be shown in the background of another: All empty cells of the foreground part let the background shine through in a lighter color. You can stack up any number of layers. Simply select a background part from the dropdown box in the upper right of the part: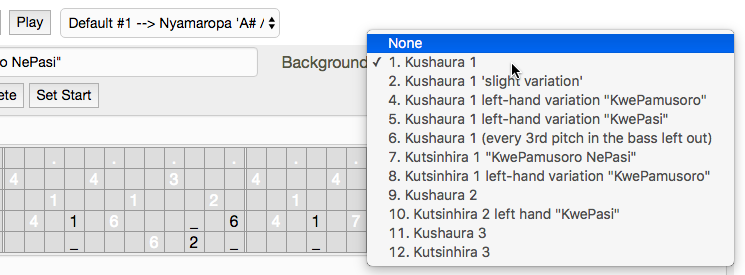
Merging and subtracting parts
The “Merge” button next to the background box merges all background notes into the foreground, i.e. all white notes become black.
Saving & duplicating pieces
Saving new pieces
You can save a new piece with the button at the very bottom of the page, or drop it with the "Exit Without Saving" button - or by simply closing the browser tab. Hint: No changes or additions become permanent until a Save button is hit, therefore it is good to save early and often.
Saving existing pieces
Once a new piece is saved, you will see a different set of buttons at the bottom of the page. Use "Save & Exit" to save changes and return to the list of your pieces.


Checking a piece for typos
After you saved a new piece, you may want to check it for typos. Occasionally right numbers end up in the wrong row, so it is a good idea to do these checks routinely. The simplest way to check a piece against a notation is to translate it to another (equivalent) notation, and then back. The translation process adds [UNTRANSLATED] details to every cell it cannot translate. Since you just want to see this error indication, and not save the piece in this state, it is best to open the same piece in two browser tabs. In the first tab you fix possible mistakes and later save the original piece, in the second tab you conduct the double translation and just close the tab when you are done.Sharing pieces
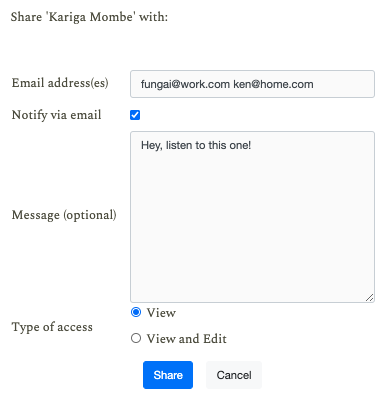
To share a piece with other users, click on "Share" in the overview list.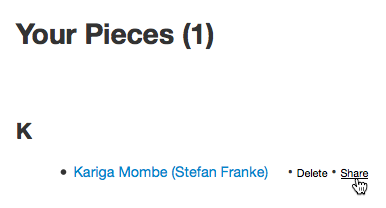
Transforming pieces
Besides employing a different notation, the translator menu offers other options to transform a piece.Transposition
You can transpose a piece up or down by 1-3 scale degrees. Choose a translator from the "Transposition" section, and press the "Translate Now" button. (Note: This currently work only with the mbira dzavadzimu in Pitch notation, or matepe/madhebhe/hera in Pitch.4 notation. If you are using another notation, first translate to these notations, then transpose, then translate back to your preferred notation.)- Shift transposes the audible piece by shifting each note up or down on the instrument's key range wherever possible, regardless of playing areas. Notes leaving the instrument's range at the lower or upper end are transposed by an octave, back into the range. This method occasionally leads to a finger having to play two different notes at the same time.
- Cycle tries to retain more of the motoric pattern by transposing notes locally within the playing areas (as if each area was its own instrument). (on the mbira dzavadzimu three playing areas are considered: bottom manual, upper left manual including the RT3 key, and right hand side). This may result in wider intervals which e.g. break up melodic lines or local patterns.
Translating pieces to another instrument type
You can translate a piece to another instrument by choosing a translator from the "Other Instruments" section, and pressing the "Translate Now" button.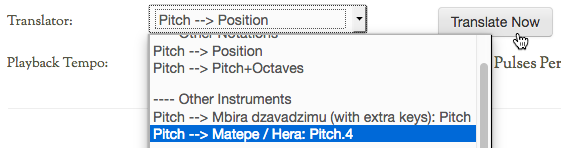
- between mbira dzavadzimu in Pitch notation and matepe / madhebhe / hera in Pitch.4 notation
- between mbira dzavadzimu and in Pitch notation njari in Pitch.1/4 notations
- between matepe / madhebhe / hera in Pitch.4 notation and njari in Pitch.1/4 notations
- between nyonganyonga / malimba in Pitch.1 notation and matepe / madhebhe / hera in Pitch.4 or Rattletree notations
- between karimba in Pitch.4 notation and njari in Pitch.1/4 notations
- the nyunga nyunga to the bigger karimba in Pitch.4 notation
- between mbira dzavadzimu (with extra keys) and mbira dzavadzimu in either Pitch or Position notation. Two translators are available here: The B2, extra key can either be mapped to the lower B1 or to the higher octave B2.
Piece metadata
The form field in the metadata section at the top of a piece page should be by and large self-explanatory. Let's look at the non-obvious bits:Alternative name(s)
The Alternative Name(s) section is meant to list alternative names of the piece, one name per field. Use the and buttons to add and remove fields.
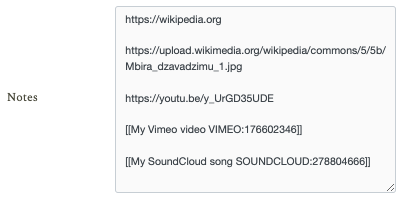
Hyperlinks and media
If you paste URLs (hyperlinks) into the Medium Details, Where, Source Details, Lyrics, or Notes fields, they will appear as clickable links below the respective field after you have saved the piece:
|
|
[[My link to Wikipedia https://wikipedia.com]]
will be shown as
Shorthand for embedding videos and SoundCloud tracks
Instead of with a URL, you can also embed embed media players like this:
        [[My Youtube video YOUTUBE:11KXsY2ZMM0]]

        [[My VideoPress video VIDEOPRESS:Hp6Rgzuh]]

        [[My Vimeo video VIMEO:176602346]]

        [[My SoundCloud song SOUNDCLOUD:278804666]]
Media start times
Playback start times specified in Youtube or Vimeo links are passed to the embedded media players. In the shorthand format, specify start times like this:
        [[YOUTUBE:11KXsY2ZMM0@90]] (Start at 90secs)

        [[VIDEOPRESS:11KXsY2ZMM0@75]] (Start at 75secs)

        [[VIMEO:176602346@1m30s]] (Start at 1min 30secs)
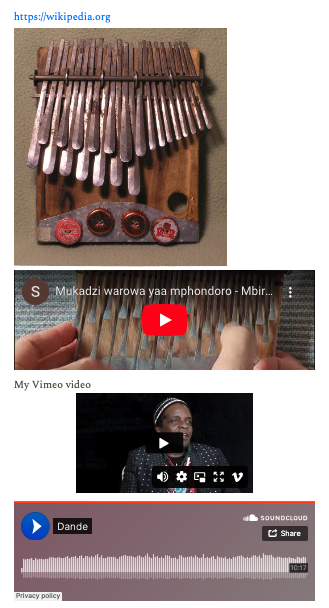
Embedding images
To embed an image on a page, you can just paste the URL that ends with a valid image file extension. You can add a caption:
[[My image description https://upload.wikimedia.org/wikipedia/commons/5/5b/Mbira_dzavadzimu_1.jpg]]
IMAGE: prefix.
[[My image description IMAGE:/static/images/gallery/TIC_129_Mana_embudzi/0.JPG]]
Embedding audio files
Embedding audio works exactly like embedding images. For common files extensions (.mp3 .wav .ogg) just paste the URL, otherwise use theAUDIO: prefix:
[[A major chord AUDIO:https://upload.wikimedia.org/wikipedia/commons/6/6f/Dur_jm.ogg]]
Preferences
Open the preferences page via the User menu in the top right corner.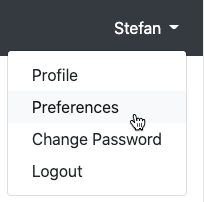
Playback instruments
In the Instruments section you can choose you preferred playback instruments for each instrument type.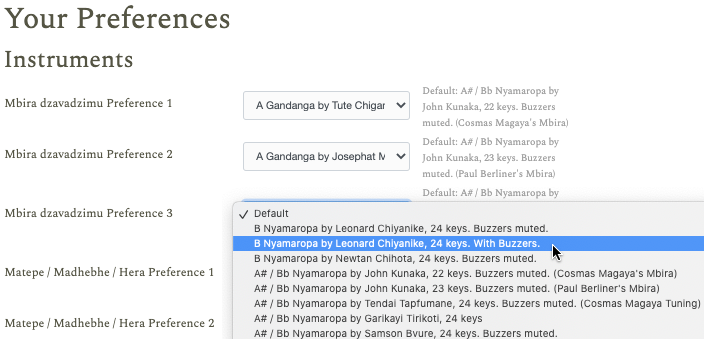
Playback start point
Use this setting to determine where audio playback of a piece starts.
- From beginning

Starts playback from the beginning of the part. The standard setting.
- Starting point of the day

Starts from a fixed pulse which is randomly chosen every day.
Starting mbira parts at unfamiliar positions may reveal new perspectives on the music. To further facilitate this, consider muting the Hosho sound. This option was inspired by Erica Azim's starting point of the week exercise. - Globally synchronous

Continues playback from where it would be if it had been playing since the beginning of time.
Use this option to synchronize playback across browser tabs, or even different browsers.
Hosho volume
This option determines the volume of the Hosho shaker sound.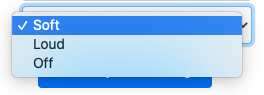
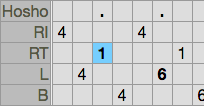
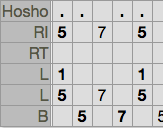
Notations
A notation is a set of names for the keys of an instrument. This website supports different notations for most instruments, and users can translate their transcriptions to any other notation with a few clicks. Key names have two parts: The row label and the cell content. In the picture below the cursor sits in a row RT on a cell with a 1. Both components are required to identify the key, so the full key name in the notation is RT1.